I thought I'd update you on all my cake doings as of now. Just to keep a good timeline going. Here we go!
This is the
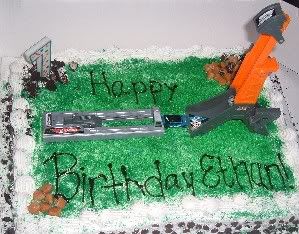
veeeery first cake I ever did (2006). It was my nephew's 7th birthday. All this was was a CostCo sheet cake with some grocery story bought decorations and a hot wheels toy. It was a fun way to take a dip in the caking waters. Who knew what it'd blow up to??
This was the second cake (2006). It was taken from a cake decorating book from Debbie Brown modified to be my own. It was for a friend's 18th birthday. This was my first experience
ever with carving and fondant! Pretty good for a first try if I do say so myself! This kind of set it all in motion for me.
Third (2007). This was kind of a set back for me. As you can tell I basically slapped it together. Absolutely no knowledge of dowels or cardboard for stability (what does that mean??). And apparently "smooth" wasn't in, either! But it was okay. It was very personalized. It was for the same friend as the previous picture. This was for her 19th birthday, though.
Fourth (2008). I lied, 2008 is when caking really took off for me. I did more cakes that year than I ever had. I started becoming the cake kid in the family and took every birthday opportunity I could! This was for my niece's 10th birthday. Kind of a set back, yet again, with a basic pan cake and store bought decorations. Don't worry, it gets progressively better!
Fifth (2008). This was a friend's 25th birthday cake. This was a BLAST to do! I think it turned out pretty well. It's pretty straight forward design so not much to explain here! Though about this time I had started buying better cake supplies. A leveler! Gel colors! Who'da thunk it??
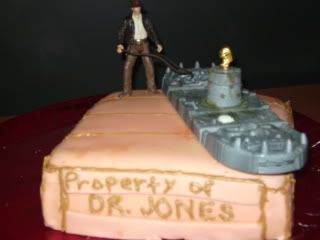
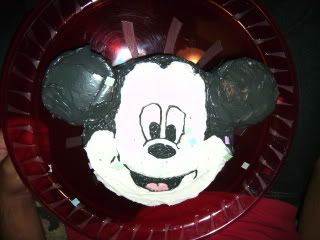
Sixth (2008). This was the nephew's 9th birthday cake. (I feel like I'm kinda screwed up on my timeline, but there's too many photos that weren't labeled!! Oh, well. I'm doing my best. This is close to accurate. Nothing way off. Anyways...). This was a fondant covered cake. With BC (buttercream) frosting accents. I used a store bought toy. He was super stoked with this because he's in a huge Indiana Jones phase right now!
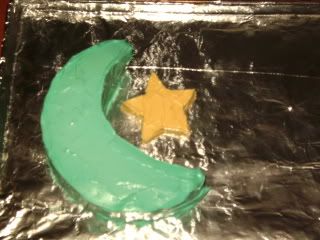
Seventh (2008). This was my mom's birthday cake. The moon was really blue, but the stupid flash made it green! Anyway, this is our "special moon". Some people have songs... we have a moon! I even have it tattooed on my back! Oh, and the star was a non-edible, wooden star (kinda redundant!) covered in frosting. I just couldn't get the points sharp enough with actual cake. Frustrating!
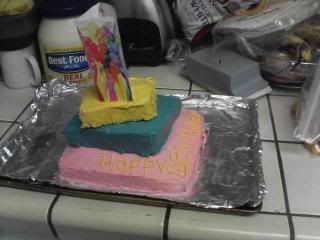
Eighth (2008). This is the one that's out of place, I think. I think it came a little before this, but oh well! This was a "just because I felt like it" cake. I wanted to practice tiered cakes. Some things you should know when doing this: 1) make all tiers the same thickness (or at least proportioned better!) 2) cover each tier separately! 3) dowels and cardboard!!! Still hadn't learned that lesson, yet!
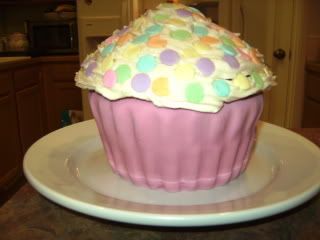
Ninth (2008). This was my first venture with the Giant Cupcake Pan (Wilton) and it would not be my last! The bottom half was covered in fondant and the swirly was done with a star tip (a star tip that was not big enough! Another lesson learned!) Giant sprinkles were popped on top.
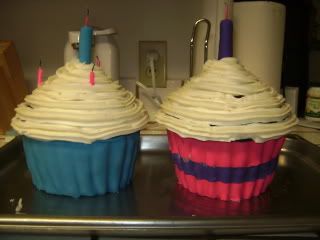
Tenth & Eleventh (2008). My other niece and nephew saw the Giant Cupcake and wanted their own! So, they both got one for their shared birthday party. Again, fondant covered bottom and a swirl of BC on top. This time I used a big enough star tip! (1M in case you were curious). These two got trick sparkler candles poked in the top with fondant covering to give more of a "birthday candle" look.
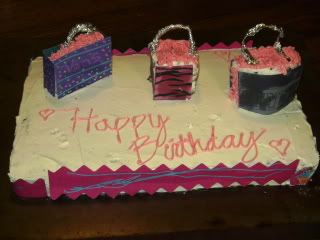
Twelfth (2009). I can't take a huge amount of credit for this. I iced the cake, stacked the little "shopping bags" on top, and did the writing. All other decorations (including sides and the outsides of the bags) were done by all the nieces and nephews. This was for their mom's birthday.
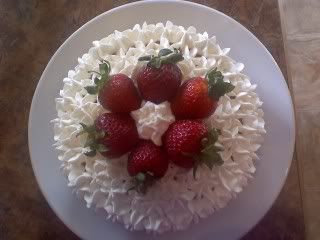
Thirteenth (2009). This was my first cake in the new house in Idaho. It was my twin cousins' birthdays and they don't like regular cake. Strawberry shortcake it is! Turns out this is now
THE most popular cake in our family gatherings now. I believe I've made about 7 since. Maybe if I'm feeling generous I'll share my found recipe later on, but for now, we need to move on!
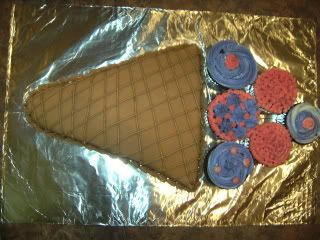
Fourteenth (2009). This was for a friend's sister's birthday. I think she was turning 10, but don't quote me. This was the first cake I ever got "reimbursed" for. It was a great feeling. It was a design the mom and daughter picked out. Simple sheet cake cut into a triangle for the bottom (covered in fondant) and cupcakes for the "ice cream scoops" swirled with BC. Fun to do!
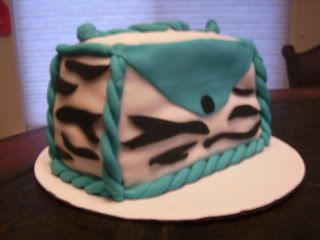
Fifteenth (2009). This was a trial run for the same friend's
other sister. The mom had asked in passing about a zebra purse for her 8th grade graduation. I silently freaked out and vowed to practice first. So here's the practice! Important: 1) BC must be smooth before fondant is applied! 2) cut dowels slightly shorter than cake... NOT longer! 3) make accents to hide said mistakes! 4) roll appliques thin... they'll look more realistic that way. Oh, and in case you were wondering, they got an ice cream cake from somewhere else instead :( but in her defense, she didn't know I practiced or even remembered her passerby suggestion! :D
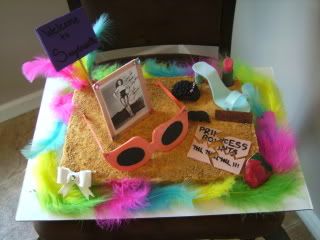
Sixteenth (2009). This was for previously mentioned friend's (with all the sisters) 20th birthday. We're both pretty much in love with the movie "To Wong Foo, Thanks for Everything, Julie Newmar". A movie about drag queens which is why there is lip stick, a pair of awesome orange sunglasses, a wig, false eyelashes, a big high heel, a "boa", a strawberry (see the movie!), ripped up "princess points" (see the movie!), a "Dullard" name tag (see the movie!), and of course a picture of the statuesque Julie Newmar! All done in gumpaste, except the feathers of course!
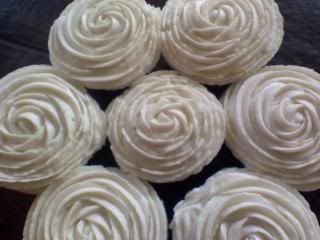
"Seventeenth" (2009). I put "quotes" in because this wasn't really anything special. Cupcakes with a simple BC swirl. The only reason I even bothered posting was because this was my trial run at the BC
rose swirl. Let's all ooooh and aaahhhh now :D
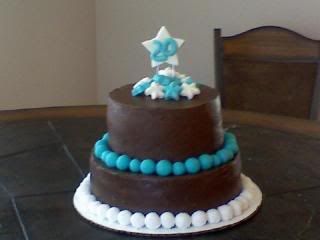
Eighteenth (2009). Sorry for the crappy photo quality! It was a camera phone. Anywho, this was my very own 20th birthday cake. It was my first attempt at a REAL tiered cake. I finally got the lesson of CARDBOARD! and DOWELS! make for stable cake! Thank you to all my CC (cakecentral.com) friends! They are the greatest over there! Back to the cake! This was also my first attempt at a ganache covered cake. I'm still working on the smoothing aspect of it (but hey! better than the first disaster!). All the accents were fondant and gumpaste. You can't tell but the bottom white balls were also rolled in sanding sugar so they sparkled. Oooohhh pretty!
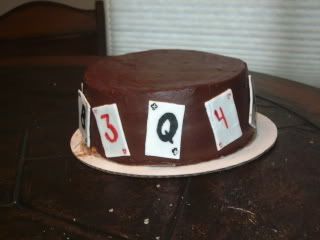
Nineteenth (2009). This is my most recent cake. Recent as is just finished yesterday! I had quite a few mishaps with this one. All the cards are MMF (marshmallow fondant) but they cracked so much! It was horrendous! Still working on smoothing that darn ganache. I'll get it, I swear! I also put wax paper underneath to cake the mess of my ganache, but OF COURSE I couldn't get it out from underneath! Why should I be able to?? So, that's what that lovely little mess is on the left. This was for my Gran's weekly Bridge Gathering. She was thrilled and that's all that matters!!
Okay, you're officially all caught up! I swear the rest of this blog won't be a huge long list of old pictures. I'm still working out what it
will be, but I'll be sure to let you know! ;)
Thanks for putting up with me again! Until next time...


